Wednesday, 28 December 2011

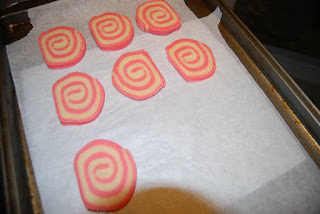
pink swirl peppermint sandwich cookies!

so i haven't posted anything in a bit, since i've been busy with christmas things and whatnot. but these deserved to be remembered. when i saw them i knew i had to make them, and i did.. and they were amazing. but it took a lot of effort. i mean not an insane amount, but more than i would usually spend on cookies. i'd make them again, but only for super special occasions :)


they are actually supposed to be red swirls, however i do not own any red food colouring...so pink it was. but i believe they look just as cute, if not more so... but possibly a tad less festive. these are cute on their own too, however i took two and sandwiched them with peppermint buttercream in between. at first they were crunchy and slightly difficult to eat, but they get better with age! after a day or two, the frosting softens up the cookies and they turn into soft sugary goodness.


here's the recipe!


Yields about 2 dozen cookie sandwiches
Vanilla Sugar Cookies
3/4 cup (1 1/2 sticks) salted butter
1 cup granulated sugar
2 eggs
1 1/2 teaspoons vanilla extract
2 1/2 cups all-purpose flour
1 teaspoon baking powder
1/2 teaspoon salt
Red gel food coloring, as needed
In a large mixing bowl, cream together the butter and sugar until light and fluffy. Add in the eggs one at a time, mixing well between each addition. Beat in the vanilla. Add the flour, baking powder, and salt, mixing until well combined.
Remove 1/2 of the dough and add red/pink food coloring to the remaining dough, beating until well mixed. Gel food color will work best. Water based food colors will most likely leave you with a more faded colour, no matter how much coloring you add. Wrap each dough separately in plastic wrap and refrigerate for a half hour to an hour to firm up the dough.
Roll out one color of dough to 1/4-inch thick rectangle on a lightly floured non-stick baking mat or wax paper. Roll out the second color of dough to 1/4-inch thick rectangle of the same size on a lightly floured surface. Place the second rectangle on top of the first and trim the edges until even. Using the mat or wax paper, roll the dough into a log. Secure with rubber bands and place in the refrigerator for 4 hours to firm up.
Preheat oven to 350 degrees F (180 degrees C). Line a baking sheet with parchment paper for best cookie removal.
Remove rubber bands from cookie log and place on a lightly floured surface. Cut cookies to 1/8-inch thick and place on prepared baking sheet. Bake cookies for 7-8 minutes; do not allow the edges to brown. Cool completely on a cooling rack before frosting.

**note: i had a bit of extra dough left from cutting off the extra pieces around the outside of the rectangle, so i rolled the pieces out and made a mini roll as well, so i had some adorable mini cookie sandwiches... if i had of known they'd be so perfectly bite-sized, i'd have done them all like that!


Peppermint Frosting
8 tablespoon butter, room temperature
2-3 cups powdered sugar
1 teaspoon peppermint extract
2 tablespoons heavy cream
Pinch of salt
In a large mixing bowl, beat butter until smooth. Add 2 cups powdered sugar and continue beating on low until combined. Mix in peppermint extract, heavy cream, and salt. If frosting is too thick, add an additional teaspoon or two of heavy cream to smooth it out. If frosting is too thin, add additional cup of powdered sugar until desired texture is reached.
Using a pastry bag (or plastic bag with the corner cut out), pipe peppermint buttercream onto the bottom of a pinwheel cookie and sandwich with another cookie. Repeat this using all pinwheel cookies. Let buttercream dry before storing cookies in an airtight container.

the finished product, ready for the holiday party upstairs (along with Tara's chocolate raspberry thumbprint cookies!)

Thursday, 22 December 2011

Christmas Drink Syrups


Ever wonder what starbucks/bridgehead/second cup/etc. puts into those christmas lattes to make them taste so good? flavoured syrups! :) i just happened to stumble upon a great page on making these easy syrups to add to your own coffee and/or hot chocolate and/or mixed drinks! (gingerbread & spiced rum anyone?) thus, here are the recipes and my photos of the steps!


 Gingerbread Syrup

Ingredients:
2 tsp. ground ginger
1 tsp. ground cinnamon
½ tsp. ground allspice
¼ tsp. ground cloves
1 tsp. molasses
1 cup water
1 cup sugar

Directions:
Combine all ingredients in a small saucepan over medium heat.  Heat, stirring occasionally, until the sugar is completely dissolved.  Let simmer gently for 10 minutes.  Pour the mixture through a fine mesh sieve lined with cheesecloth ( i used a coffee filter).  Store in the refrigerator until ready to use.


Toffee Syrup
Ingredients:
¾ cup water
¾ cup sugar
½ cup toffee bits

Directions:
Combine the water, sugar, and toffee bits in a small saucepan.  Heat over medium-high, stirring occasionally, just until the sugar is dissolved.  Remove from the heat and pour through a fine mesh sieve into a liquid measuring cup.  Let stand at room temperature about 30 minutes.  Use a spoon to skim the solids off of the top.  Transfer to a storage container and refrigerate until ready to use.


I only made gingerbread and toffee flavours but you could essentially make any kind you wanted depending on the source of the flavour- i.e. candy canes for peppermint, eggnog, cinnamon, chocolate, etc.

Saturday, 10 December 2011

Gingerbread cupcakes


These cupcakes are so good! instead of making the standard gingerbread cookie, i made... gingerbread cupcakes! complete with cinnamon cream cheese frosting. As long as you have all of the ingredients lying around (some rarer than others....i.e. molasses, cloves, etc), these cupcakes are really easy to make and taste super good. I made 24 with this recipe but some of them are pretty small, so I'd go for maybe about 15 big ones next time instead. but make them... you won't regret it. also, i'd like to add that the cinnamon cream cheese frosting is possibly the best icing i've ever... EVER had. here's the recipe: (I believe it's originally Martha Stewart, but i slightly altered it)


For the Cupcakes:
  • 1 1/2 cups all-purpose flour
  • 2 tablespoons ground ginger
  • 2 teaspoons ground cinnamon
  • 1/4 teaspoon ground cloves
  • 1/4 teaspoon ground nutmeg
  • 1 1/2 cups unsalted butter (3 sticks), room temperature
  • 1 1/2 cups sugar
  • 3 tablespoons molasses
  • 4 large eggs, room temperature
  • 1 teaspoon vanilla extract
  • 22 3-inch gingerbread men (or in my case, snowflakes- these i didn't make myself, they are Pillsbury) 


For Cinnamon Cream Cheese Frosting:
  • 8 ounces cream cheese, softened (1 brick)
  • 3 cups powdered sugar (I used 4)
  • 2 teaspoons vanilla extract
  • 2 teaspoons cinnamon


Directions:
  1. Preheat to 350 degrees F. Line muffin pan with baking cup liners.
  2. In a large bowl, sift together flour and spices; set aside.
  3. In the bowl, cream the butter and sugar until light, about 3 minutes. Beat in the molasses until incorporated. Beat in eggs one at a time. Beat in vanilla. Add flour and mix on low speed until just combined.
  4. Fill the cupcake papers three-quarters full, making sure that the batter is divided evenly. Bake cupcakes until a toothpick inserted in the center of them comes out clean, about 25 minutes. Let cupcakes cool on a wire rack 10 minutes.
  5. To make the cinnamon cream frosting: Combine the cream cheese and powdered sugar until smooth. Add cinnamon and vanilla extract and beat until combined.
  6. Place frosting into a large decorators decorating bag fitted with the 1M tip and approximately 1/4″ above cupcake top at a 90° angle to cupcake surface,  pipe a spiral of icing, beginning at the outer edge and working inward. Top with a cookie (snowflake/man) 

Sunday, 4 December 2011

Orange Cinnamon Muffins


Sunday calls for making.... something. These muffins have been a huge favourite for a while, and I make them pretty frequently. They're like a mixture between donut and muffin. And there's orange in them, so you can use that as an excuse to call them a breakfast food. Everyone loves them. 


Instead of the nutmeg I substituted cinnamon in (1 tsp) and I added zest of 1 orange. I can't imagine making them without the orange anymore, it just completes the muffin.


Recipe:


1/3 cup butter, melted
1/2 cup sugar
1 egg 
1 1/2 cup all purpose flour
1 1/2 tsp. baking powder
1/2 tsp. salt
1 tsp cinnamon
1/2 cup milk (I've also used almond milk and soya milk- they all work.)

zest from 1 orange (use a zester, the fine side of a cheese grater or if all else fails, scrape the orange peel with a beer bottle cap...i know you have some lying around.)

Topping
1/2 cupsugar
1/2 cup butter, melted
2 tsp cinnamon


photos of the process:


Preheat oven to 350F.

In a medium-large bowl, combine dry ingredients. Add wet ingredients and stir until combined, but still a bit lumpy. Don't overmix. Scoop batter into muffin tins that have sprayed with cooking spray. Using a scoop, scoop batter into muffin tin. This only makes about 10 medium sized muffins. Bake for 20-25 minutes, or until they just start to turn a bit golden at the edges.

For the topping, mix sugar and cinnamon in a small bowl. Place melted butter in another small bowl. Dip the warm muffins in melted butter, then in cinnamon sugar....


EAT. 


Tuesday, 29 November 2011

MARSHMALLOWS!

So stoked! I've been waiting to try these forever. They're soooo good and so cute! I love making homemade marshmallows and it's retarded easy! If you ever wondered what marshmallows are made of... it's basically sugar and gelatin. Complex, right? Certainly not the healthiest of recipes, but what on here is? The best part about making homemade marshmallows is flavouring them any way you want... vanilla (classic), cinnamon, lemon, orange, strawberry, almond, peppermint, coconut... I could go on. I used MAPLE! How good would that be with hot chocolate? Damn. If you're feeling especially adventurous, coat them in chocolate, candy or toasted coconut.

WARNING: ATTEMPTING THESE MAKE YOUR KITCHEN, YOUR TOOLS AND YOU UNBELIEVABLY STICKY AND COATED IN SUGAR.


and here are the photos of the mess.

it starts as a mixture of sugar, corn syrup and water. so nutritious. 

then you dump it into a bowl of gelatin and beat. and you beat for a very longgggg time......

before picture (nice liquid.)


AFTER PICTURE! about to jam mixer.


crazy mess.

3 hours later.

 and the cutting...


beautiful, delicious finished product.

Sunday, 20 November 2011

mo cookies

in the spirit of movember, in which countless men grow their 'staches to both raise awareness for prostate cancer and entice the ladies, my friends and I held a movember party. for this party, I luckily found some moustache-shaped cookie cutters to make some treats.


since I had to make cut-out cookies, and didn't want to do something boring like plain sugar cookies, I decided to look into something more exotic. chocolate shortbread was something I was looking into, but with one secret ingredient..... cayenne pepper!


I used this shortbread recipe and added the cayenne myself (about 1/2 tsp). I omitted the pink pepper, but   also added 1 tsp of cinnamon. Instead of the cacao nibs, I finely chopped a bar of dark chocolate (to measure about 1/4 cup) and added that as well. I also recommend not baking these for the full 20 minutes the recipe calls for, because my first batch burnt within 15. I found that 10-12 minutes was about perfect.

....and they were perfect! dark, chocolatey, rich, and just when I thought I should have added more cayenne, BAM the warmth and spice of it comes in strong at the end (but isn't overwhelming). I can't wait to make these again (probably included in christmas baking.)

obviously they were a hit at the party :) (see cookie models below)


Sunday, 13 November 2011

carrot cake!


Last night we had an early christmas celebration with the family, so I decided to make some carrot cake cupcakes from scratch (with cream cheese icing)! The recipe was great and they turned out perfect! However, if you like your carrot cake to be a bit spicier you could add some nutmeg or allspice, as this recipe only called for cinnamon. Voila!

Here's the link to the recipe.


Saturday, 22 October 2011

Tribal

continuing the series with a new drawing...

Friday, 21 October 2011

Pretty in pink

happy friday! today i made the cupcakes for the baby shower tomorrow, as well as some extras for some of my favourite people... (you know who you are)

so these cupcakes are french vanilla with vanilla buttercream frosting.

this time i added more milk to the icing and the roses i attempted came out SO well! so i made a bunch of cupcakes with buttercream icing roses on top... and they look gorgeous. check it.

traditional girly pink this time!
ready to go


my roses! beautiful and delicious. (and the lovely tara trying one)


and of course, my fav girls 


Monday, 17 October 2011

Monday blues cupcakes

hey guys! so this is my first post...obviously that's cupcake worthy.


i have been asked to make cupcakes for someone's baby shower next weekend and since i hadn't tried putting much effort into decorating cupcakes in the past, i decided i should start. this week i went and bought some tools:

  • wilton featherlight piping bag
  • wilton piping tips
i knew the basics of how to pipe icing, but had never tried. and even trickier was the idea of having to make a frosting with the right consistency to hold up when piped. 

....but, i am happy to report, that it all worked out amazingly! can't imagine the calorie count of these....


sad to report the cupcakes themselves were made from a box.... this experiment was really all about the icing.


 the finished product

my first attempt at an icing rose.

my second, and much better attempt.